When Apache Kudu was first released in September 2016, it didn’t support any kind of authorization. Anyone who could access the cluster could do anything they wanted. To remedy this, coarse-grained authorization was added along with authentication in Kudu 1.3.0. This meant allowing only certain users to access Kudu, but those who were allowed access could still do whatever they wanted. The only way to achieve finer-grained access control was to limit access to Apache Impala where access control could be enforced by fine-grained policies in Apache Sentry. This method limited how Kudu could be accessed, so we saw a need to implement fine-grained access control in a way that wouldn’t limit access to Impala only.
Kudu 1.10.0 integrated with Apache Sentry to enable finer-grained authorization policies. This integration was rather short-lived as it was deprecated in Kudu 1.12.0 and will be completely removed in Kudu 1.13.0.
Most recently, since 1.12.0 Kudu supports fine-grained authorization by integrating with Apache Ranger 2.1 and later. In this post, we’ll cover how this works and how to set it up.
How it works
Ranger supports a wide range of software across the Apache Hadoop ecosystem, but unlike Sentry, it doesn’t depend on any of them for fine-grained authorization, making it an ideal choice for Kudu.
Ranger consists of an Admin server that has a web UI and a REST API where admins can create policies. The policies are stored in a database (supported database systems are Microsoft SQL Server, MySQL, Oracle, PostgreSQL, and SQL Anywhere) and are periodically fetched and cached by the Ranger plugin that runs on the Kudu Masters. The Ranger plugin is responsible for authorizing the requests against the cached policies. At the time of writing this post, the Ranger plugin base is available only in Java, as most Hadoop ecosystem projects, including Ranger, are written in Java.
Unlike Sentry’s client which we reimplemented in C++, the Ranger plugin is a fat client that handles the evaluation of the policies (which are much richer and more complex than Sentry policies) locally, so we decided not to reimplement it in C++.
Each Kudu Master spawns a JVM child process that is effectively a wrapper around the Ranger plugin and communicates with it via named pipes.
Prerequisites
This post assumes the Admin Tool of a compatible Ranger version is installed on a host that is reachable by both you and by all Kudu Master servers.
Note: At the time of writing this post, Ranger 2.0 is the most recent release
which does NOT support Kudu yet. Ranger 2.1 will be the first version that
supports Kudu. If you wish to use Kudu with Ranger before this is released, you
either need to build Ranger from the master branch or use a distribution that
has already backported the relevant bits
(RANGER-2684:
0b23df7801062cc7836f2e162e1775101898add4).
To enable Ranger integration in Kudu, Java 8 or later has to be available on the Master servers.
You can build the Ranger subprocess by navigating to the java/ inside the Kudu
source directory, then running the below command:
$ ./gradlew :kudu-subprocess:jarThis will build the subprocess JAR which you can find in the
kudu-subprocess/build/libs directory.
Setting up Kudu with Ranger
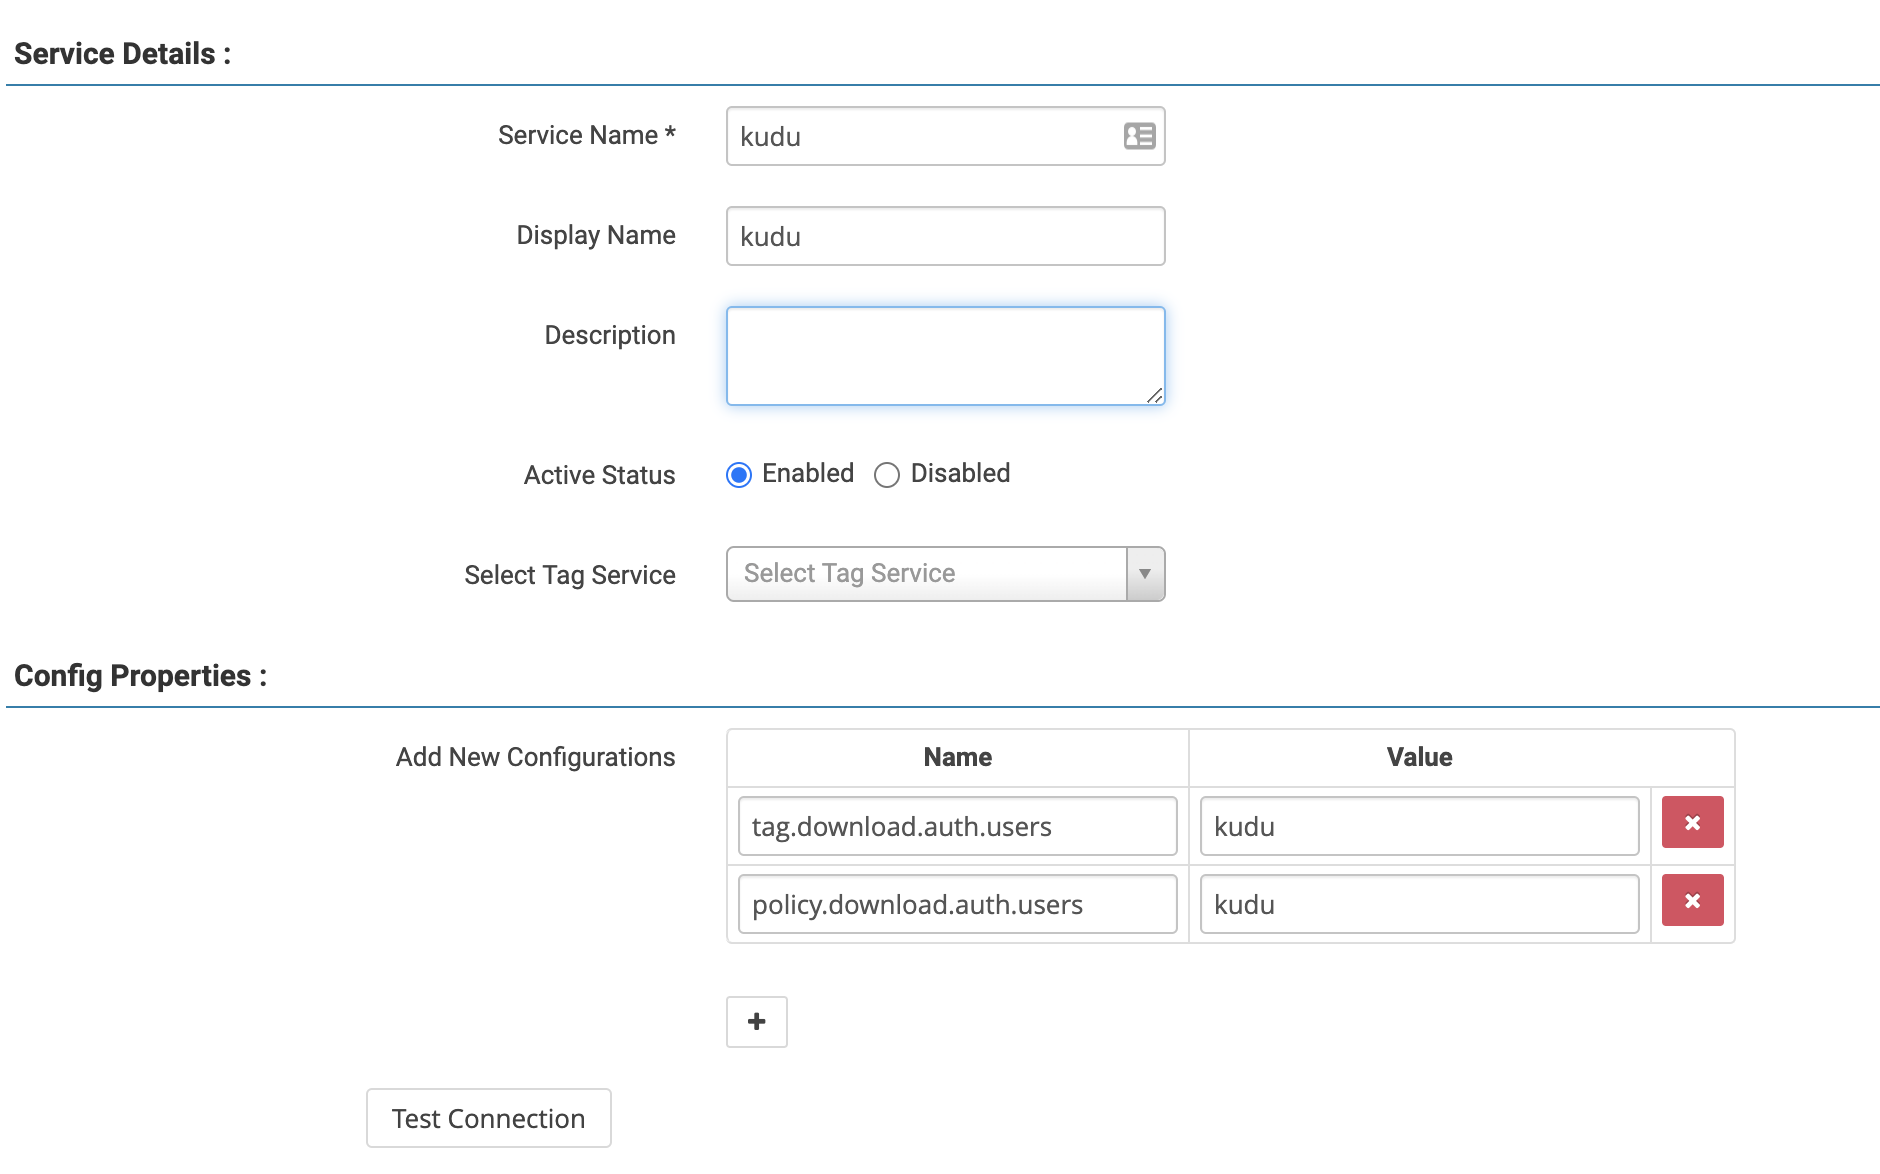
The first step is to add Kudu in Ranger Admin and set tag.download.auth.users
and policy.download.auth.users to the user or service principal name running
the Kudu process (typically kudu). The former is for downloading tag-based
policies which Kudu doesn’t currently support, so this is only for forward
compatibility and can be safely omitted.

Next, you’ll have to configure the Ranger plugin. As it’s written in Java and is
part of the Hadoop ecosystem, it expects to find a core-site.xml in its
classpath that at a minimum configures the authentication types (simple or
Kerberos) and the group mapping. If your Kudu is co-located with a Hadoop
cluster, you can simply use your Hadoop’s core-site.xml and it should work.
Otherwise, you can use the below sample core-site.xml assuming you have
Kerberos enabled and shell-based groups mapping works for you:
<configuration>
  <property>
    <name>hadoop.security.authentication</name>
    <value>kerberos</value>
  </property>
  <property>
    <name>hadoop.security.group.mapping</name>
    <value>org.apache.hadoop.security.ShellBasedUnixGroupsMapping</value>
  </property>
</configuration>
In addition to the core-site.xml file, you’ll also need a
ranger-kudu-security.xml in the same directory that looks like this:
<configuration>
  <property>
    <name>ranger.plugin.kudu.policy.cache.dir</name>
    <value>/path/to/policy/cache/</value>
  </property>
  <property>
    <name>ranger.plugin.kudu.service.name</name>
    <value>kudu</value>
  </property>
  <property>
    <name>ranger.plugin.kudu.policy.rest.url</name>
    <value>http://ranger-admin:6080</value>
  </property>
  <property>
    <name>ranger.plugin.kudu.policy.source.impl</name>
    <value>org.apache.ranger.admin.client.RangerAdminRESTClient</value>
  </property>
  <property>
    <name>ranger.plugin.kudu.policy.pollIntervalMs</name>
    <value>30000</value>
  </property>
  <property>
    <name>ranger.plugin.kudu.access.cluster.name</name>
    <value>Cluster 1</value>
  </property>
</configuration>ranger.plugin.kudu.policy.cache.dir- A directory that is writable by the user running the Master process where the plugin will cache the policies it fetches from Ranger Admin.ranger.plugin.kudu.service.name- This needs to be set to whatever the service name was set to on Ranger Admin.ranger.plugin.kudu.policiy.rest.url- The URL of the Ranger Admin REST API.ranger.plugin.kudu.policy.source.impl- This should always beorg.apache.ranger.admin.client.RangerAdminRESTClient.ranger.plugin.kudu.policy.pollIntervalMs- This is the interval at which the plugin will fetch policies from the Ranger Admin.ranger.plugin.kudu.access.cluster.name- The name of the cluster.
Note: This is a minimal config. For more options refer to the Ranger documentation
Once these files are created, you need to point Kudu Masters to the directory
containing them with the -ranger_config_path flag. In addition,
-ranger_jar_path and -ranger_java_path should be configured. The Java path
defaults to $JAVA_HOME/bin/java if $JAVA_HOME is set and falls back to
java in $PATH if not. The JAR path defaults to kudu-subprocess.jar in the
directory containing the kudu-master binary.
As the last step, you need to set -tserver_enforce_access_control to true on
the Tablet Servers to make sure access control is respected across the cluster.
Creating policies
After setting up the integration it’s time to create some policies, as now only trusted users are allowed to perform any action, everyone else is locked out.
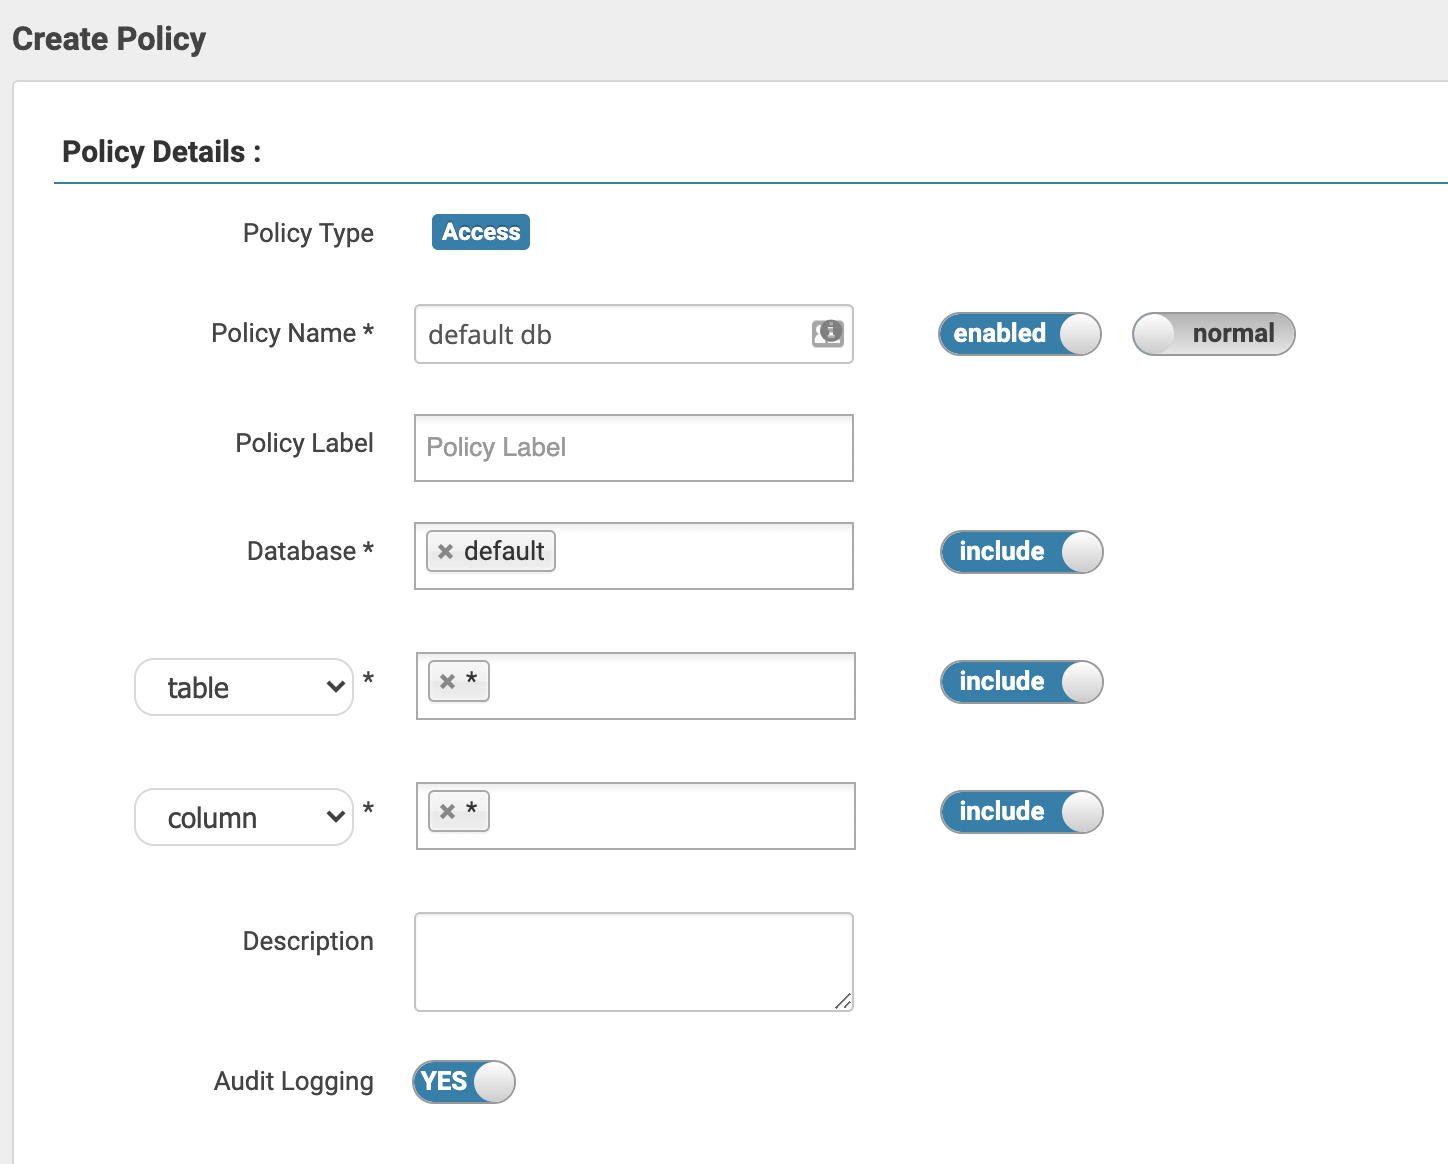
To create your first policy, log in to Ranger Admin, click on the Kudu service
you created in the first step of setup, then on the “Add New Policy” button in
the top right corner. You’ll need to name the policy and set the resource it
will apply to. Kudu doesn’t support databases, but with Ranger integration
enabled, it will treat the part of the table name before the first period as the
database name, or default to “default” if the table name doesn’t contain a
period (configurable with the -ranger_default_database flag on the
kudu-master).
There is no implicit hierarchy in the resources, which means that granting
privileges on db=foo won’t imply privileges on foo.bar. To create a policy
that applies to all tables and all columns in the foo database you need to
create a policy for db=foo->tbl=*->col=*.

For a list of the required privileges to perform operations please refer to our documentation.
Table ownership
Kudu 1.13 will introduce table ownership, which enhances the authorization experience when Ranger integration is enabled. Tables are automatically owned by the users creating the table and it’s possible to change the owner as a part of an alter table operation.
Ranger supports granting privileges to the table owners via a special {OWNER}
user. You can, for example, grant the ALL privilege and delegate admin (this
is required to change the owner of a table) to {OWNER} on
db=*->table=*->column=*. This way your users will be able to perform any
actions on the tables they created without having to explicitly assign
privileges per table. They will, of course, need to be granted the CREATE
privilege on db=* or on a specific database to actually be able to create
their own tables.

Conclusion
In this post we’ve covered how to set up and use the newest Kudu integration, Apache Ranger, and a sneak peek into the table ownership feature. Please try them out if you have a chance, and let us know what you think on our mailing list or Slack. If you run into any issues, feel free to reach out to us on either platform, or open a bug report.