Guide for New Developers
Environment
Gluten supports Ubuntu 20.04/22.04, CentOS 7/8, and MacOS.
JDK
Gluten supports JDK 8 for Spark 3.2, 3.3, 3.4, and 3.5. For Spark 3.3 and later versions, Gluten also supports JDK 11 and 17.
Note: Starting with Spark 4.0, the minimum required JDK version is 17. We recommend using a higher JDK version now to ease migration when deploying Gluten for Spark 4.0 in the future. In addition, we may upgrade Arrow from 15.0.0 to a newer release, which will require JDK 11 as the minimum version.
By default, Gluten compiles packages using JDK 8. Enable maven profile by -Pjava-17 or -Pjava-11 to use the corresponding JDK version, and ensure that the JDK version is available in your environment.
If JDK 11 or a higher version is used, Spark and Arrow require setting the java args -Dio.netty.tryReflectionSetAccessible=true, see SPARK-29924 and ARROW-6206.
Add the following configs in spark-defaults.conf:
spark.driver.extraJavaOptions=-Dio.netty.tryReflectionSetAccessible=true
spark.executor.extraJavaOptions=-Dio.netty.tryReflectionSetAccessible=true
Maven
Gluten requires Maven 3.6.3 or above.
GCC
Gluten requires GCC 11 or above.
Development
To debug Java/Scala code, follow the steps in build-gluten-with-velox-backend.
To debug C++ code, compile the backend code and gluten C++ code in debug mode.
## compile Velox backend with benchmark and tests to debug
gluten_home/dev/builddeps-veloxbe.sh --build_tests=ON --build_benchmarks=ON --build_type=Debug
Note: To debug the tests under <gluten_home>/gluten-ut/, you must compile java code with -Pspark-ut.
Java/scala code development
Linux IntelliJ local debug
Install the Linux IntelliJ version, and debug code locally.
- Ask your linux maintainer to install the desktop, and then restart the server.
-
If you use Moba-XTerm to connect, you don’t need to install x11 server. If you are using another tool, such as putty, follow this guide: X11 Forwarding: Setup Instructions for Linux and Mac
- Download IntelliJ Linux community version to Linux server.
-
Start Idea using the following command:
bash <idea_dir>/idea.sh
Set up Gluten project
- Make sure you have compiled Gluten.
- Load the Gluten by File->Open, select <gluten_home/pom.xml>.
- Activate your profiles such as
<backends-velox>, then Reload Maven Project to activate all the needed modules. - Create breakpoints and debug as you wish. You can use
CTRL+Nto locate a test class to start your test.
Java/Scala code style
IntelliJ supports importing settings for Java/Scala code style. You can import intellij-codestyle.xml to your IDE. See IntelliJ guide.
To format Java/Scala code using the Spotless plugin, run the following command:
./dev/format-scala-code.sh
C++ code development
This guide is for remote debugging by connecting to the remote Linux server using SSH.
Download and install Visual Studio Code.
Key components found on the left side bar are:
- Explorer (Project structure)
- Search
- Run and Debug
- Extensions (Install the C/C++ Extension Pack, Remote Development, and GitLens. C++ Test Mate is also suggested.)
- Remote Explorer (To connect to the linux server using ssh, click +, then enter
ssh USERNAME@REMOTE_SERVER_IP_ADDRESS) - Manage (Settings)
Input your password in the above pop-up window. It will take a few minutes to install the Linux VSCode server in the folder ~/.vscode-server on the remote machine.
If the download fails, delete this folder and try again.
Note: If VSCode is upgraded, you must download the linux server again. We recommend switching the update mode to off. Search update in Manage->Settings to turn off update mode.
Set up project
- Select File->Open Folder, then select the Gluten folder.
- After the project loads, you will be prompted to Select CMakeLists.txt. Select the
${workspaceFolder}/cpp/CMakeLists.txtfile. - Next, you will be prompted to Select a Kit for the Gluten project. Select GCC 11 or above.
Settings
VSCode supports two ways to configure user settings.
- Manage->Command Palette (Open
settings.json, search byPreferences: Open Settings (JSON)) - Manage->Settings (Common setting)
Build using VSCode
VSCode will try to compile using debug mode in <gluten_home>/build. You must compile Velox debug mode before compiling Gluten.
Note: If you have previously compiled Velox in release mode, use the command below to compile in debug mode.
cd incubator-gluten/ep/build-velox/build/velox_ep

# Build the Velox debug version in <velox_home>/_build/debug
make debug EXTRA_CMAKE_FLAGS="-DVELOX_ENABLE_PARQUET=ON -DENABLE_HDFS=ON -DVELOX_BUILD_TESTING=OFF  -DVELOX_ENABLE_DUCKDB=ON -DVELOX_BUILD_TEST_UTILS=ON"
Then Gluten will link the Velox debug library.
Click build in the bottom bar to enable IntelliSense features like search and navigation.
Debug setting
The default compile command does not enable tests and benchmarks, so the corresponding executable files are not generated. To enable the test and benchmark args, create or edit the <gluten_home>/.vscode/settings.json to add the configurations below:
{
    "cmake.configureArgs": [
        "-DBUILD_BENCHMARKS=ON",
        "-DBUILD_TESTS=ON"
    ],
    "C_Cpp.default.configurationProvider": "ms-vscode.cmake-tools"
}
After compiling with these updated configs, you should have executable files, such as <gluten_home>/cpp/build/velox/tests/velox_shuffle_writer_test.
Open the Run and Debug panel (Ctrl-Shift-D) and then click the link to create a launch.json file. If prompted, select a debugger like C++ (GDB/LLDB). The launch.json will be created under <gluten_home>/.vscode/.
Note: Change name, program, args for your environment.
Click the Add Configuration button in launch.json, and select gdb launch to start a program for debugging or attach to attach a running program for debugging.
Then you can create breakpoints and debug using Run and Debug in Visual Studio Code.
Debug Velox code
For some Velox tests such as ParquetReaderTest, tests need to read the parquet file in <velox_home>/velox/dwio/parquet/tests/examples. Select ParquetReaderTest.cpp in the IDE window, then click Start Debugging, otherwise No such file or directory exception will be raised.
Clang format
Gluten uses clang-format 15 to format source files.
apt-get install clang-format-15
Set config in settings.json
"clang-format.executable": "clang-format-15",
"editor.formatOnSave": true,
If multiple clang-format versions are installed, formatOnSave may not take effect. To specify the default formatter, search for default formatter in Settings, then select Clang-Format.
If formatOnSave still has no effect, select a single file and use SHIFT+ALT+F to format it manually.
CMake format
To format cmake files like CMakeLists.txt and *.cmake, install cmake-format.
pip3 install --user cmake-format
Here is an example of how to format a file using the command line:
cmake-format --first-comment-is-literal True --in-place cpp/velox/CMakeLists.txt
After the above installation, you can optionally do some configuration in Visual Studio Code to easily format cmake files.
- Install
cmake-formatextension in Visual Studio Code. - Configure the extension. To do this, open the settings (File -> Preferences -> Settings), search for
cmake-format, and configure the following settings as shown:- Set Args:
--first-comment-is-literal=True. - Set Exe Path to the path of the
cmake-formatcommand. If you installedcmake-formatin a standard location, you might not need to change this setting.
- Set Args:
- Format your CMake files by right-clicking in a file and selecting
Format Document.
Add unit tests
-
For Native Code Modifications: If you have modified native code, use gtest to test the native code. A secondary option is to add Gluten UT to ensure coverage.
-
For Gluten-Related Code Modifications: If you have modified code related to Gluten, it is preferable to add scalatest rather than JUnit. Additionally, the test classes should be placed in the org.apache.gluten package.
-
For Spark-Related Code Modifications: If you have modified code related to Spark, it is preferable to add scalatest rather than JUnit. Additionally, the test classes should be placed in the org.apache.spark package.
-
Placement of Non-Native Code UTs: Ensure that unit tests for non-native code are placed within org.apache.gluten and org.apache.spark packages. This is important because the CI system runs unit tests from these two paths in parallel. Placing tests in other paths might cause your tests to be ignored.
View Surefire reports of Scala unit tests in GHA
Surefire reports are invaluable tools in the ecosystem of Java-based applications that utilize the Maven build automation tool.
These reports are generated by the Maven Surefire Plugin during the testing phase of your build process.
They compile results from unit tests, providing detailed insights into which tests passed or failed, what errors were encountered, and other essential metrics.
Surefire reports play a crucial role in the development and maintenance of high-quality software.
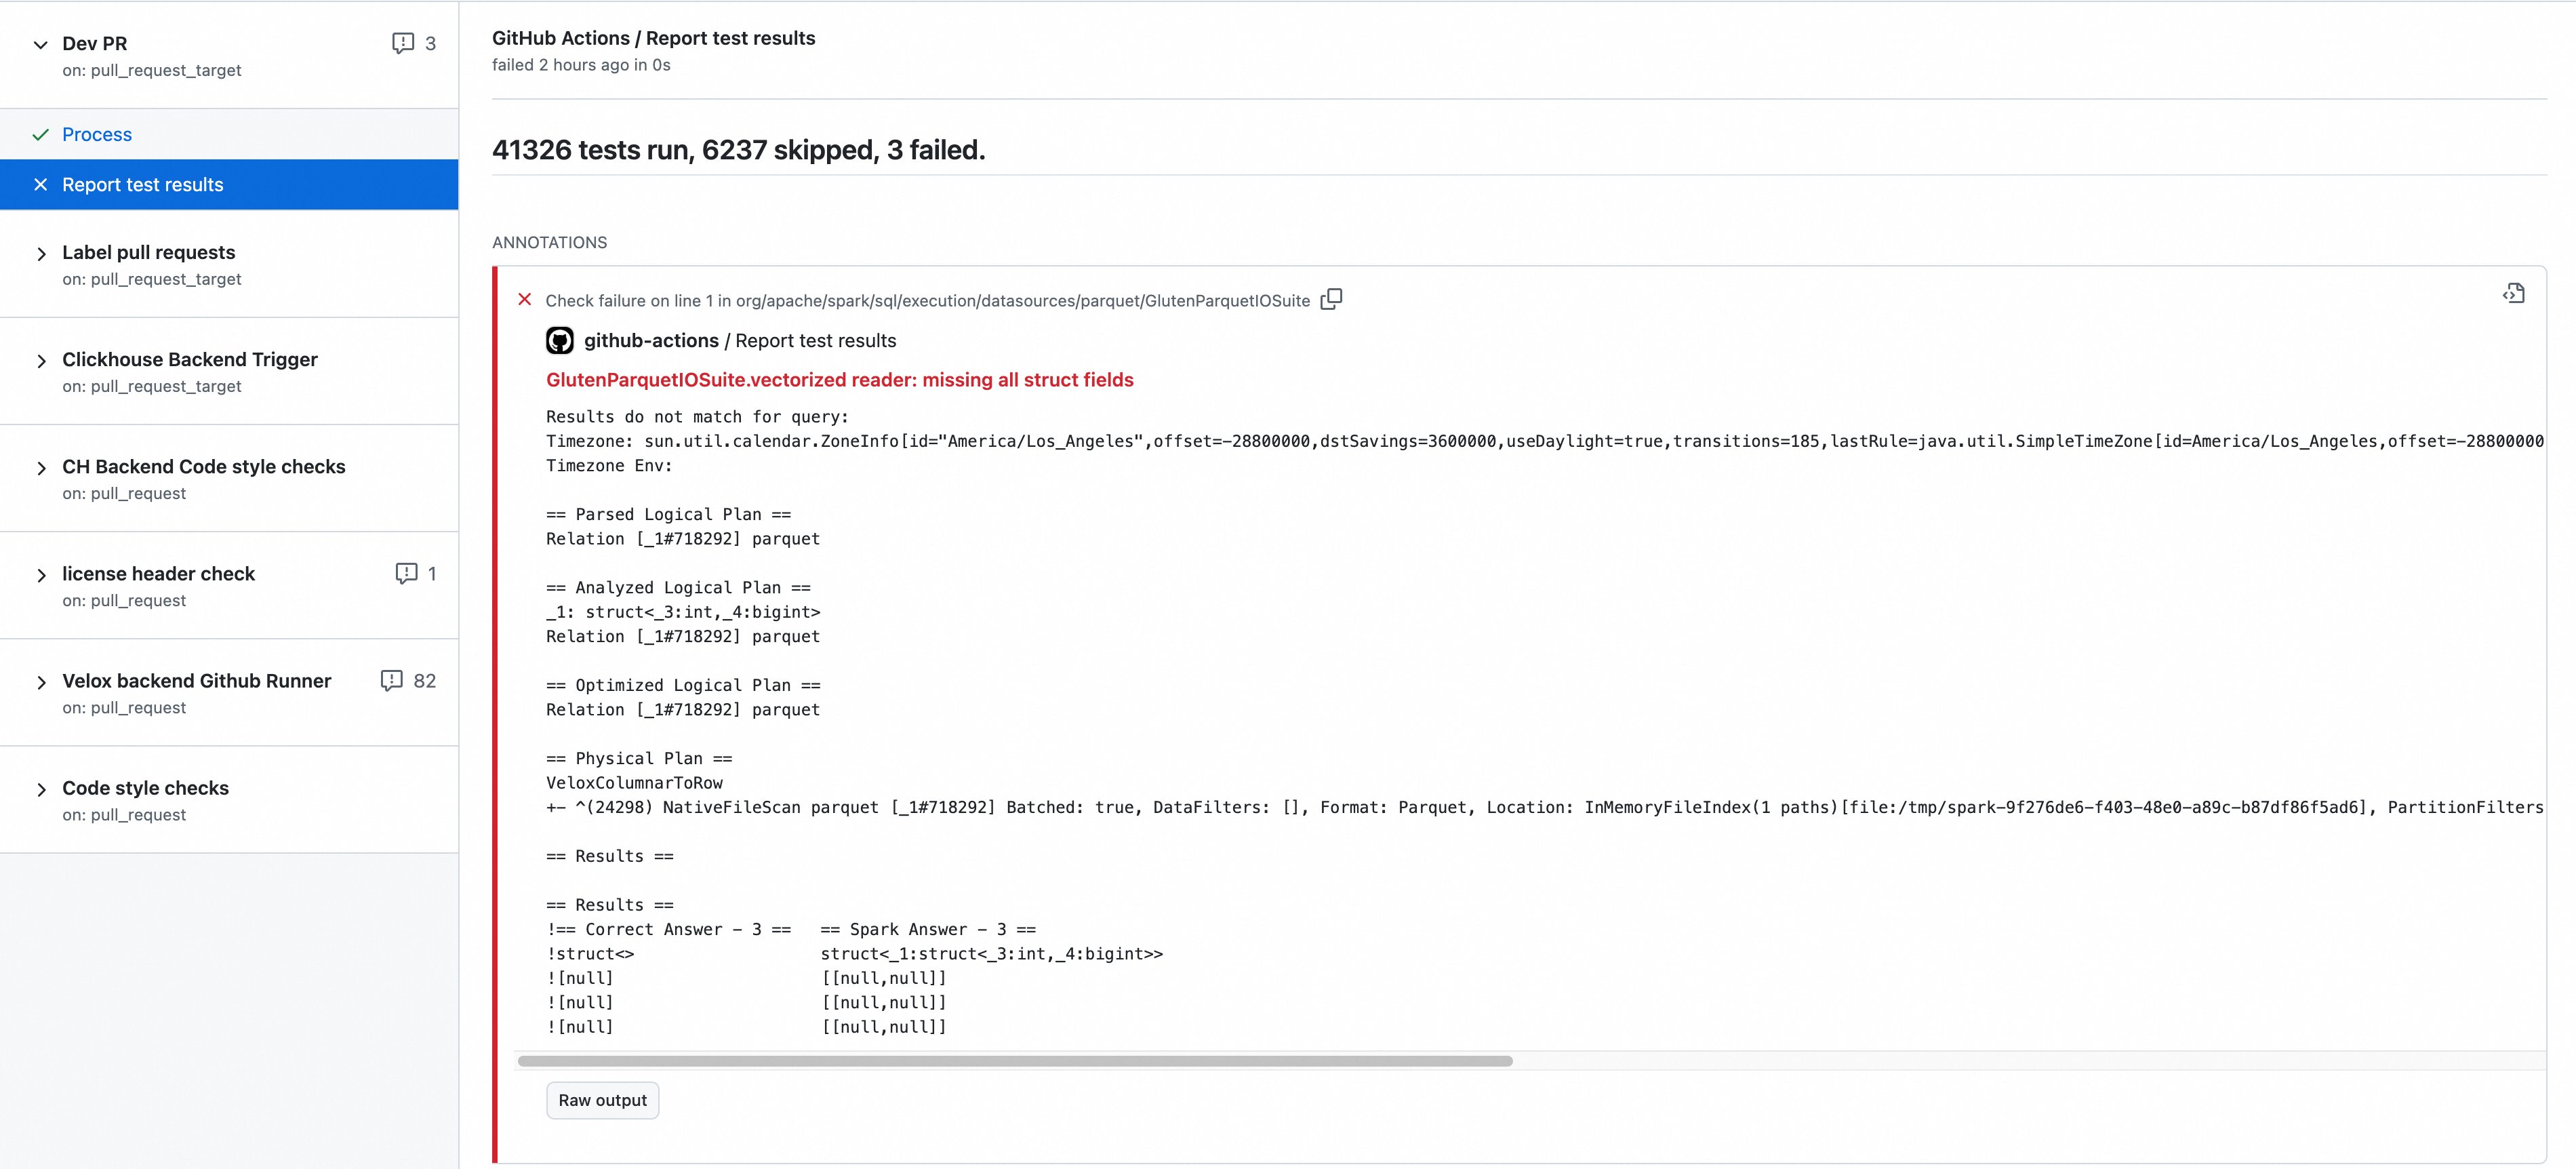
In GitHub Actions, we expose Surefire test reports so developers can review error messages and stack traces from failing unit tests.
To check Surefire reports:
- Click the Checks Tab in PR.
- Find Report test results in Dev PR.
- There, you can check the results with summary and annotations.
Mac development
Compile
Gluten does not provide a prebuilt JAR for macOS. However, you can compile it yourself and run or debug it locally using an IDE.
First, set the installation prefix for dependencies:
export INSTALL_PREFIX=$HOME/velox/deps-install
All Velox-related libraries will be installed under the directory specified by INSTALL_PREFIX.
Use the following commands to build Gluten. Note that on macOS you must disable tests (–build_tests=OFF), as some tests do not run successfully.
# Build velox and gluten-cpp
./dev/builddeps-veloxbe.sh --run_setup_script=ON --build_arrow=ON --build_tests=OFF
# Build java code
mvn clean install -Pbackends-velox -Pspark-3.4 -DskipTests
Note: follow the steps in build-gluten-with-velox-backend.
After the build completes, you can use your IDE to run and debug Gluten locally.
Intellij debug
Intellij requires two extra config to execute the unit test.
- Set the JDK to Azul zulu - aarch64
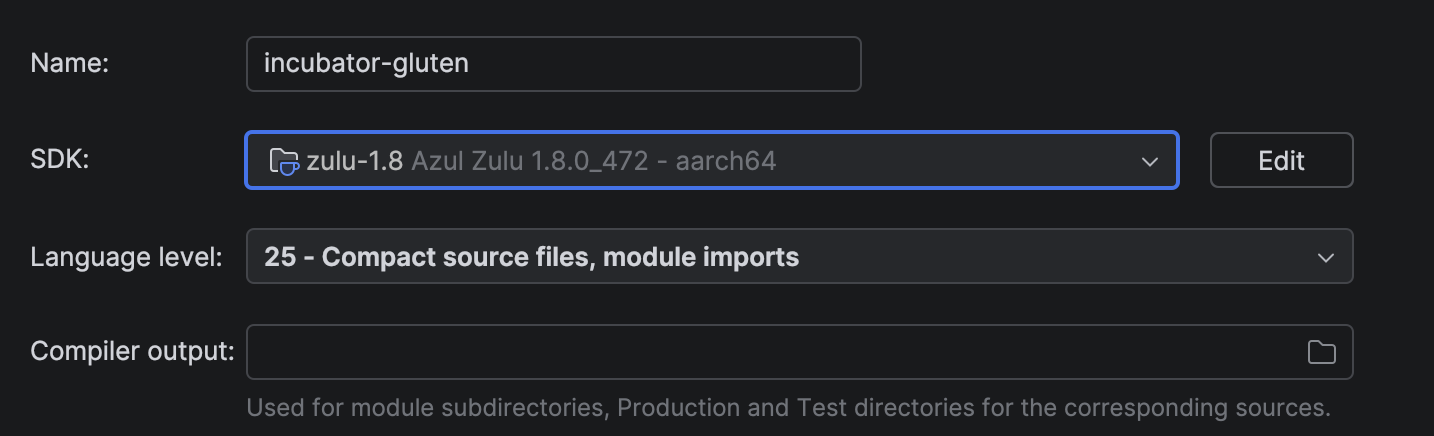
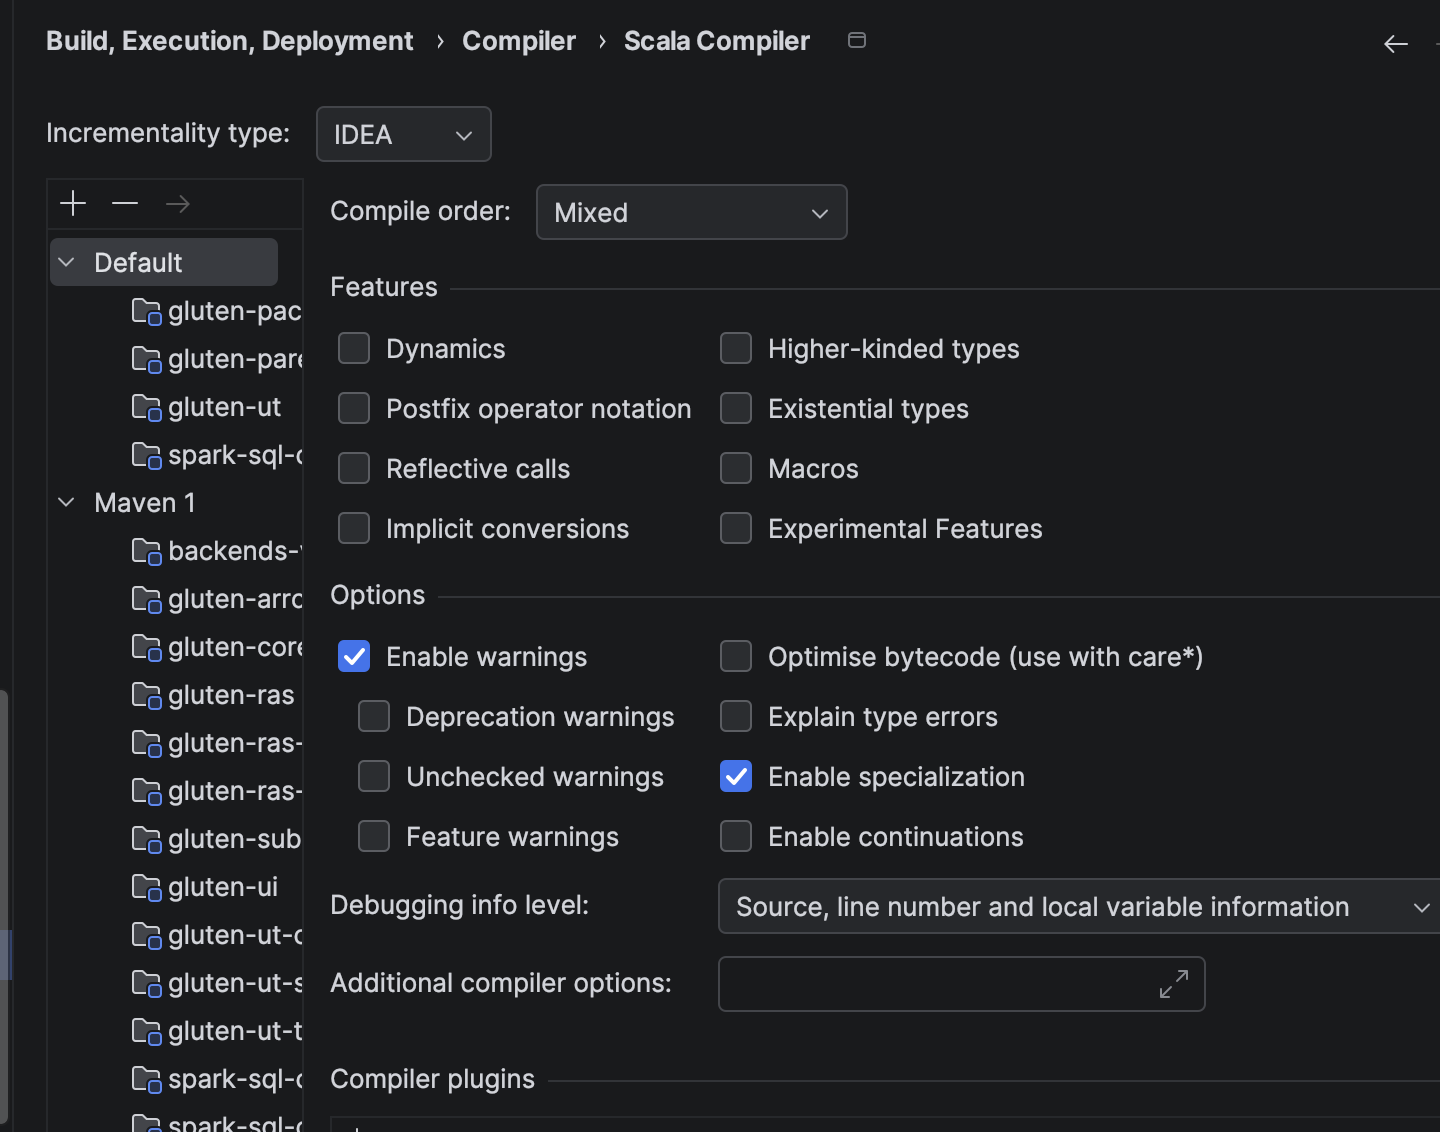
- Set scala compiler
Incrementality typetoIDEA
Debug C++ Code with Core Dump
mkdir -p /mnt/DP_disk1/core
sysctl -w kernel.core_pattern=/mnt/DP_disk1/core/core-%e-%p-%t
cat /proc/sys/kernel/core_pattern
# set the core file to unlimited size
echo "ulimit -c unlimited" >> ~/.bashrc
# then you will get the core file at `/mnt/DP_disk1/core` when the program crashes
# gdb -c corefile
# gdb <gluten_home>/cpp/build/releases/libgluten.so 'core-Executor task l-2000883-1671542526'
core-Executor task l-2000883-1671542526 is the generated core file name.
(gdb) bt
(gdb) f7
(gdb) set print pretty on
(gdb) p *this
- Get the backtrace
- Switch to 7th stack
- Print the variable in a more readable way
- Print the variable fields
Sometimes you only get the C++ exception message. If that happens, you can generate a core dump file by running the following code:
char* p = nullptr;
*p = 'a';
or by the following commands:
gcore <pid>kill -s SIGSEGV <pid>
Debug C++ with GDB
You can use GDB to debug tests, benchmarks, and JNI calls. Place the following code to your debug path.
pid_t pid = getpid();
printf("----------------------------------pid: %lun", pid);
sleep(10);
You can also get the pid by java command or grep java program when executing unit test.
jps
1375551 ScalaTestRunner
ps ux | grep TestOperator
Execute GDB command to debug:
gdb attach <pid>
gdb attach 1375551
wait to attach....
(gdb) b <velox_home>/velox/substrait/SubstraitToVeloxPlan.cpp:577
(gdb) c
Debug Memory Leaks
Arrow memory allocator leak
If you receive an error message like the following:
4/04/18 08:15:38 WARN ArrowBufferAllocators$ArrowBufferAllocatorManager: Detected leaked Arrow allocator [Default], size: 191, process accumulated leaked size: 191...
24/04/18 08:15:38 WARN ArrowBufferAllocators$ArrowBufferAllocatorManager: Leaked allocator stack Allocator(ROOT) 0/191/319/9223372036854775807 (res/actual/peak/limit)
You can open the Arrow allocator debug config by adding the VP option -Darrow.memory.debug.allocator=true. That gives you more details, like the following example:
child allocators: 0
  ledgers: 7
    ledger[10] allocator: ROOT), isOwning: , size: , references: 1, life: 10483701311283711..0, allocatorManager: [, life: ] holds 1 buffers.
        ArrowBuf[11], address:140100698555856, capacity:128
     event log for: ArrowBuf[11]
       10483701311362601 create()
              at org.apache.arrow.memory.util.HistoricalLog$Event.<init>(HistoricalLog.java:175)
              at org.apache.arrow.memory.util.HistoricalLog.recordEvent(HistoricalLog.java:83)
              at org.apache.arrow.memory.ArrowBuf.<init>(ArrowBuf.java:97)
              at org.apache.arrow.memory.BufferLedger.newArrowBuf(BufferLedger.java:271)
              at org.apache.arrow.memory.BaseAllocator.bufferWithoutReservation(BaseAllocator.java:340)
              at org.apache.arrow.memory.BaseAllocator.buffer(BaseAllocator.java:316)
              at org.apache.arrow.memory.RootAllocator.buffer(RootAllocator.java:29)
              at org.apache.arrow.memory.BaseAllocator.buffer(BaseAllocator.java:280)
              at org.apache.arrow.memory.RootAllocator.buffer(RootAllocator.java:29)
              at org.apache.arrow.c.ArrowArray.allocateNew(ArrowArray.java:116)
              at org.apache.arrow.c.ArrayImporter.importArray(ArrayImporter.java:61)
              at org.apache.arrow.c.Data.importIntoVector(Data.java:289)
              at org.apache.arrow.c.Data.importIntoVectorSchemaRoot(Data.java:332)
              at org.apache.arrow.dataset.jni.NativeScanner$NativeReader.loadNextBatch(NativeScanner.java:151)
              at org.apache.gluten.datasource.ArrowFileFormat$$anon$1.hasNext(ArrowFileFormat.scala:99)
              at org.apache.gluten.utils.IteratorCompleter.hasNext(Iterators.scala:69)
              at org.apache.spark.memory.SparkMemoryUtil$UnsafeItr.hasNext(SparkMemoryUtil.scala:246)
CPP code memory leak
Sometimes you cannot get the coredump symbols when debugging a memory leak. You can write a GoogleTest to use valgrind for detection.
apt install valgrind
valgrind --leak-check=yes ./exec_backend_test
Run TPC-H and TPC-DS
We supply <gluten_home>/tools/gluten-it to execute these queries. See velox_backend_x86.yml.
Enable Gluten for Spark
To enable Gluten Velox backend for Spark, run the following command:
spark-shell --name run_gluten \
 --master yarn --deploy-mode client \
 --conf spark.plugins=org.apache.gluten.GlutenPlugin \
 --conf spark.memory.offHeap.enabled=true \
 --conf spark.memory.offHeap.size=20g \
 --jars https://dlcdn.apache.org/incubator/gluten/1.4.0-incubating/apache-gluten-1.4.0-incubating-bin-spark35.tar.gz \
 --conf spark.shuffle.manager=org.apache.spark.shuffle.sort.ColumnarShuffleManager
Gluten Plan Validation and Updates
VeloxTPCHSuite can verify the executed Gluten plans for the TPC-H benchmark to avoid unintentional changes. This verification is based on comparisons with the golden files that record the expected Gluten plans.
The following failure may occur in GitHub CI or local tests:
- TPC-H q5 *** FAILED ***
  Mismatch for query 5
  Actual Plan path: /tmp/tpch-approved-plan/v2-bhj/spark322/5.txt
  Golden Plan path: /opt/gluten/backends-velox/target/scala-2.12/test-classes/tpch-approved-plan/v2-bhj/spark322/5.txt (VeloxTPCHSuite.scala:101)
To update the golden files, find the actual Gluten plans in GitHub CI Artifacts or the local /tmp/ directory, then update the corresponding golden files in the tpch-approved-plan/ directory.